An updated tutorial to set up a blogdown blog
This is an updated blog post from the previous version: R Blogdown Setup in GiHub.
Inspired by this great blog, by Elio Campitelli: eliocamp.github.io/codigo-r and his settings on the hugo-tranquilpeak theme, by Louis Barranqueiro & Thibaud Leprêtre.
As the changes I made imply many modifications in paths, directories (some very subtle), they invalidate much of my previous tutorial. The changes I basically made are:
- I still use Github pages for hosting. However, I changed the rendering folder from
mastertodocs.
- Made some other fixes to the
config.tomlfile.
The steps I followed are detailed here:
Install Blogdown
## Install from CRAN
install.packages('blogdown')

## Or, install from GitHub
devtools::install_github('rstudio/blogdown')
Install Hugo
./From RStudio
You can install the Hugo framework easily from within RStudio:
?blogdown::install_hugo

blogdown::install_hugo()
./From other sources
Depending on your operating system (MSWin, MacOSX, Linux distros…) Hugo has to be installed in a different way.
The Hugo install page is a good place to start!
Git & GitHub repos
- Set up a GitHub account, following for example this.
- Set up a new GitHub repo with a name of your choice (in my case talesofr). See this and this.
- Activate GitHub pages. For this, you must go to the /settings section of your repo and find the epigraph “GitHub Pages”. In the dropdown menu, select: master branch /docs folder.

Activating GitHub pages
- Create a
gitlocal repo in your machine:- Create manually a new directory called like your repository, e.g. talesofr.
- Run in the terminal (Windows users have to install
gitfirst):
cd /Git/talesofr # your path may be different git init # initiates repo in the directory git remote add origin https://github.com/[USERNAME]/talesofr # connects git local repo to remote Github repo git pull origin master # in case you have LICENSE and Readme.md files in the GitHub repo, they're downloaded to your machine - You can add a .gitignore text file to the root directory of your repo. This tells
gitwhat files not to add to the repo, even if they are into the folder. One example of .gitignore file is this. - For now, your repo is ready. We will now focus in creating & customising our Blogdown.
RStudio and blogdown setup
We will open RStudio (my Version is 1.1.419).
- First, you may need to install Blogdown in R:
install.packages("blogdown")- In RStudio, select the Menu > File > New Project following the lower half of these instructions. The wizard for setting up a Hugo Blogdown project should be available in your RStudio version.
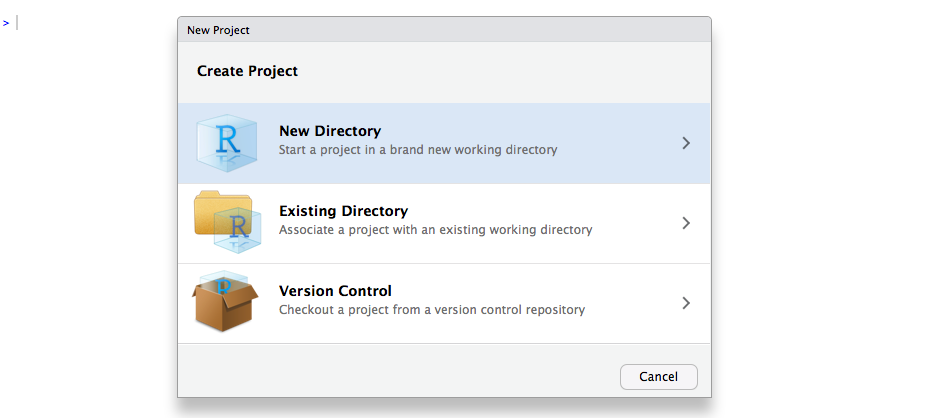
Creating new Project
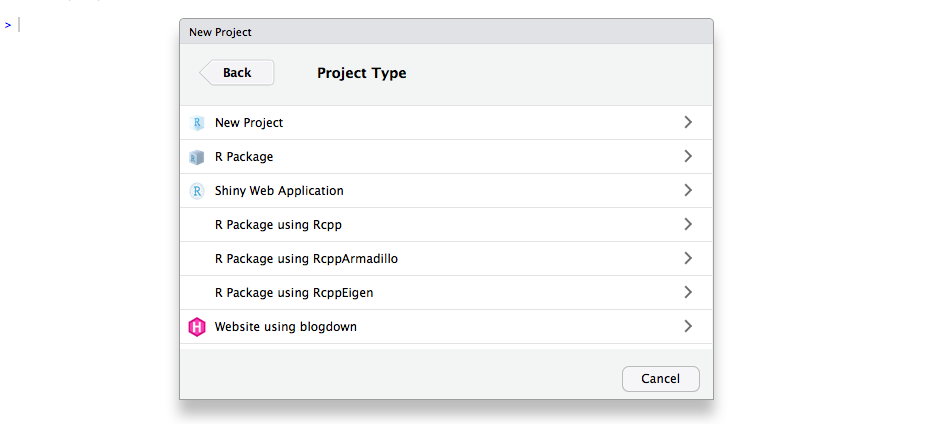
Selecting Hugo Blogdown format
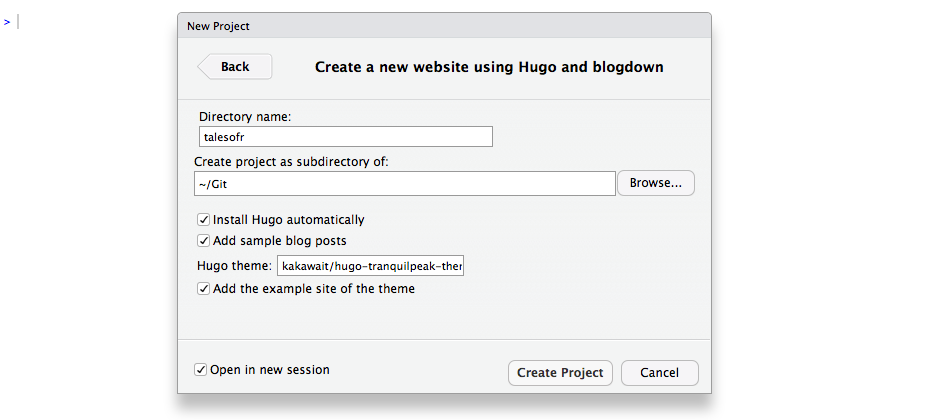
Selecting Hugo Blogdown theme
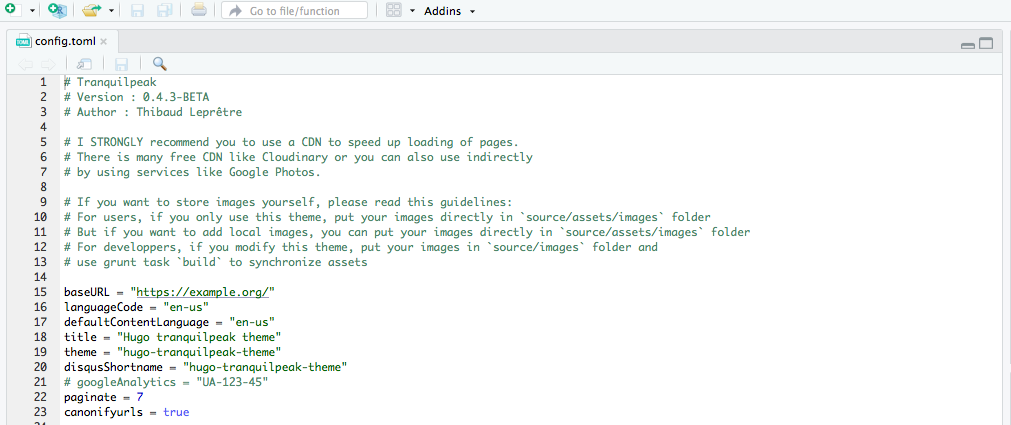
A config.toml file appears
Customising paths and styles
Before we build and serve our site, we need to tweak a couple of things in advance, if we want to smoothly deploy our blog into GitHub pages.
Modify config.toml file
To integrate with GiHub pages, there are the essential modifications at the top of our config.toml file:
- We need to set up the base URL to the “root” of the web page (https://[USERNAME].github.io/[REPO_NAME] in this case).
- By default, the web page is published in the
/publicfolder. We need it to be published in the/docsfolder of the repository (we must create it if it doesn’t exist yet), to match the structure of the GitHub docs branch (we’ll see what that means):
baseURL = "https://aurora-mareviv.github.io/talesofr/"
publishDir = "docs"- Other useful global settings:
draft: false # if set to true, changes will not be published
ignoreFiles = ["\\.Rmd$", "\\.Rmarkdown$", "_files$", "_cache$"]
enableEmoji = true
...
Images & styling paths
We can revisit the config.toml file to make changes to the default settings.
The file for the logo that appears in the corner must be placed in the /docs/logo.png path. To modify it in the config.toml:
picture = "logo.png" # the path to the logoThe cover (background) image must be located in /themes/hugo-tranquilpeak-theme/static/images. To modify it in the config.toml:
coverImage = "myimage.jpg"
# Set the full github.io URL to the image if this doesn't work
We want some custom css and js. We need to locate them in /static/css/my-style.css and in /static/js/myjs.js respectively.
  # Custom CSS. Put here your custom CSS files. They are loaded after the theme CSS;
  # they have to be referred from static root. Example
   [[params.customCSS]]
     href = "css/my-style.css"

  # Custom JS. Put here your custom JS files. They are loaded after the theme JS;
  # they have to be referred from static root. Example
   [[params.customJS]]
     src = "js/myjs.js"
Custom css
Now, we can add arbitrary classes to our css file! (see above).
Since I started writing in Bootstrap, I it a lot. Since this theme already has bootstrap classes, I brought some others I didn’t find in the theme (they’re available for .md files, but currently not for .Rmd)
alert-danger
alert-warning
alert-success
alert-info
Here is an example of a custom css file that can be copied to the file /static/css/my-style.css:
/* @import url('https://maxcdn.bootstrapcdn.com/bootswatch/3.3.7/cosmo/bootstrap.min.css'); may conflict with default theme!*/
@import url('https://fonts.googleapis.com/icon?family=Material+Icons'); /*google icons*/
@import url('https://cdnjs.cloudflare.com/ajax/libs/font-awesome/4.7.0/css/font-awesome.min.css'); /*font awesome icons*/

.input-lg {
  font-size: 30px;
}
.input {
  font-size: 20px;
}
.font-sm {
    font-size: 0.7em;
}
.texttt {
  font-family: monospace;
}
.alert {
padding: 15px;
margin-bottom: 20px;
border: 1px solid transparent;
border-radius: 4px;
}
.alert-success {
color: #3c763d;
background-color: #dff0d8;
border-color: #d6e9c6;
}
.alert-danger,
.alert-error {
  color: #b94a48;
  background-color: #f2dede;
  border-color: #eed3d7;
}
.alert-info {
  color: #3a87ad;
  background-color: #d9edf7;
  border-color: #bce8f1;
}
.alert-gray {
  background-color: #f2f3f2;
  border-color: #f2f3f2;
}

/*style for printing*/
@media print {
    .noPrint {
       display:none;
   }
    }

/*link formatting*/
a:link {
    color: #478ca7;
    text-decoration: none;
}
a:visited {
    color: #478ca7;
    text-decoration: none;
}
a:hover {
    color: #82b5c9;
    text-decoration: none;
}
An example of the alert-danger class:
<div class="well alert alert-danger text-center">
  <span class="fa fa-minus-circle"></span> alert-danger
</div>
Also, we have font-awesome icons!
Update! Hugo shortcodes in .Rmd !
Searching through blogdown/issues in GitHub, I found this good trick by Yihui:
You can add Hugo shortcodes if you wrap them with the function htmltools:HTML
htmltools::HTML("{{< hl-text danger >}}
              this is a highlighted danger text
{{< /hl-text >}}")Custom javascript
We can also add really cool functions to enhance our post. Click in the red button below!:
alert-danger
Here is the code of the button:
<div class="button well alert alert-danger text-center" id="myButton" onclick="alertColor()">
  <span id="toInfo"> <span class="fa fa-minus-circle"></span>alert-danger </span>
</div>
And here is the javascript function that you can copy into /static/js/myjs.js:
function alertColor() {
var result = "<span class='fa fa-info-circle'></span> alert-info";
document.getElementById("toInfo").innerHTML = result;
document.getElementById("myButton").style.backgroundColor = "#d9edf7";
document.getElementById("myButton").style.color = "#3a87ad";
document.getElementById("myButton").style.borderColor = "#bce8f1";
}MathJax
To correctly display LaTeX formulas, we must follow Yihui Xie’s advice in older versions of the Hugo theme.
We will simply add the following code at the bottom of our /themes/hugo-tranquilpeak-theme/layouts/partials/script.html file:
<script src="//yihui.name/js/math-code.js"></script>
<script async
src="//cdn.bootcss.com/mathjax/2.7.1/MathJax.js?config=TeX-MML-AM_CHTML">
</script>
\[\lim_{x \to \infty} \exp(-x) = 0\]
Site build with blogdown
Once we have ready our theme, we can add some content, modifying or deleting the various examples we will find in /content/post.
We need to make use of Blogdown & Hugo to compile our .Rmd file and create our html post:
blogdown::build_site()
blogdown::serve_site()
In the viewer, at the right side of the IDE you can examine the resulting html and see if something didn’t go OK.
Deploying the site
Updating the local git repository
This can be done with simple git commands:
cd /Git/[REPO_NAME] # your path to the repo may be different
git add . # indexes all files that wil be added to the local repo
git commit -m "Starting my Hugo blog" # adds all files to the local repo, with a commit message
Pushing to GitHub
git push origin master # we push the changes from the local git repo to the remote repo (GitHub repo)Just go to the page https://[USERNAME].github.io/[REPO_NAME] and enjoy your blog!
Add R code
Works just the same as in Rmarkdown. R code is compiled into an html and published as static web content in few steps. Welcome to the era of reproducible blogging!
The figure 1 uses the ggplot2 library:
library(ggplot2)
ggplot(diamonds, aes(x=carat, y=price, color=clarity)) + geom_point()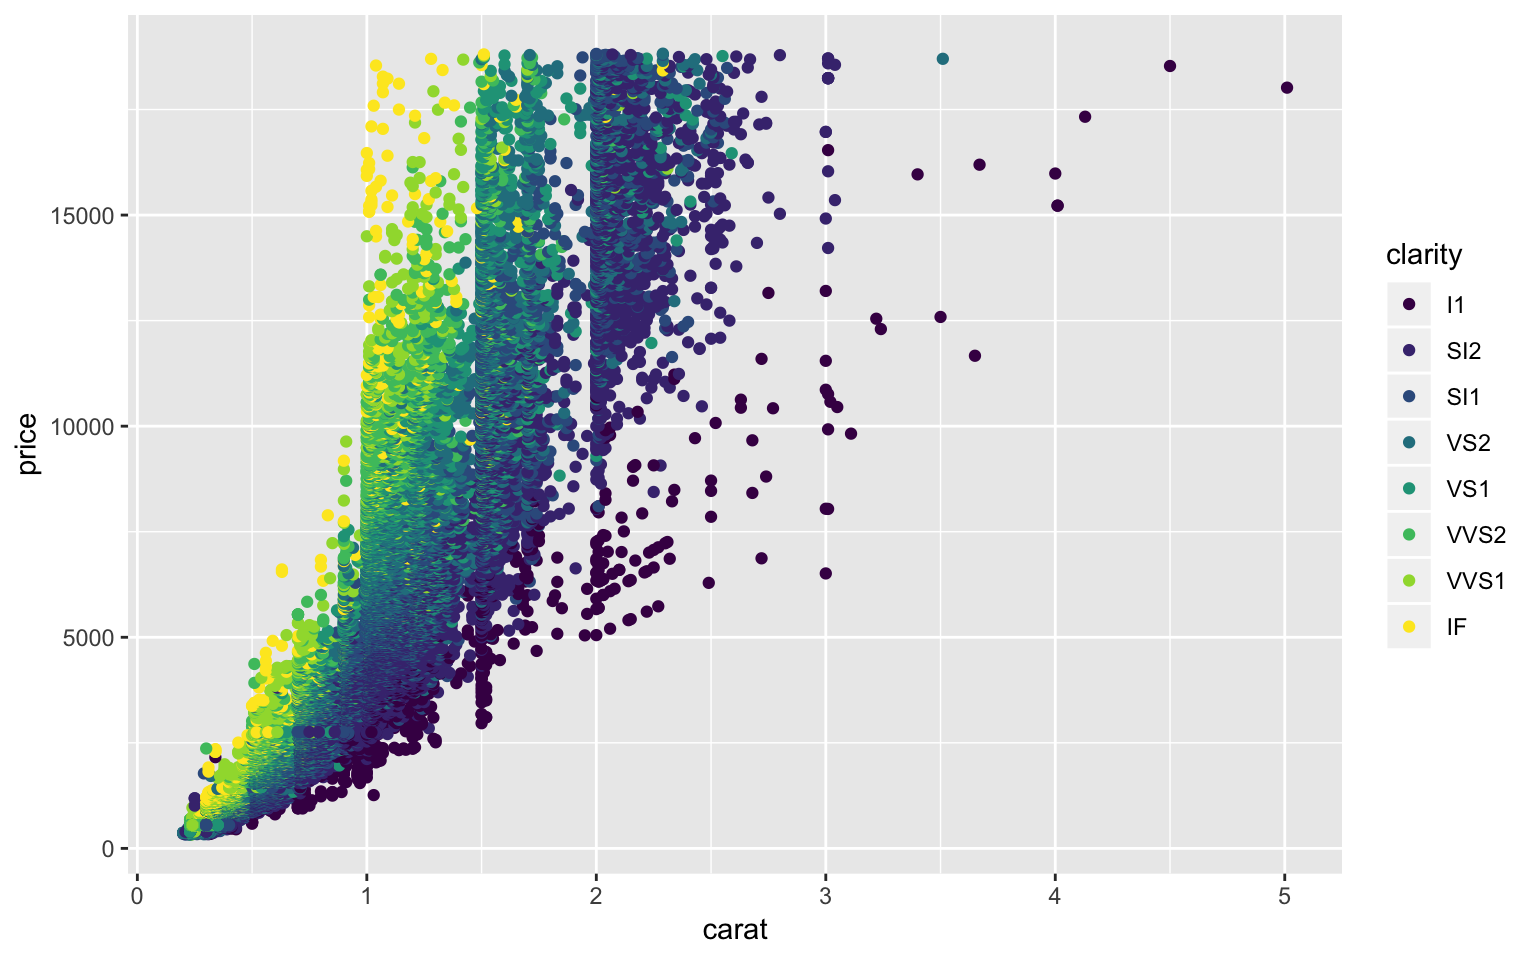
Figure 1: diamonds plot with ggplot2.
A new post in blogdown
I know there is a procedure to create a new post using the interface in RStudio (via the “Addins” button in RStudio IDE) but this one will also work:
I copied a blank .Rmd file into the folder /content/post. I gave it a different name than the other post, with the date and some explanatory text (I called it “2017-08-22-new-post.Rmd”).
Then, I added an appropriate YAML heading (similar to the one in the previous post, but changing dates and times). Beware, as the YAML header indent-sensitive:
---
title: "New Post in Blogdown"
author: "1"
date: 2018-08-26
draft: false
categories: ["R"]
tags: ["R Markdown", "blogdown", "#rstats"]
thumbnailImagePosition: left
thumbnailImage: ./images/logo.png
coverImage: ../../../images/transparent.png
coverSize: partial # full: for maximum cover size
metaAlignment: center
disable_comments: true
output:
  blogdown::html_page:
    toc: false
    fig_width: 8
    css: "/css/my-style.css"
---
Finally I added some content to the Rmarkdown and saved the changes.
We need to make use of Blogdown & Hugo to compile our .Rmd file and create our html post:
blogdown::build_site()
blogdown::serve_site()
In the viewer, at the right side of the IDE you can examine the resulting html and see if something didn’t go OK.
Deploying the site with the new post
Updating the local git repository
This can be done with simple git commands:
cd /Git/[USERNAME].github.io # your path to the repo may be different
git add . # indexes all files that wil be added to the local repo
git commit -m "Adding a new post" # adds all files to the local repo, with a commit message
Pushing to GitHub
git push origin master # we push the changes from the local git repo to the remote repo (GitHub repo)You can rinse and repeat this procedure for the rest of the posts.
This .Rmd source code
You can download it from here
Further customisation can be done thanks to the incredible user documentation for the hugo-tranquilpeak-theme